Facebook has suffered a swear blow over its role of spreading disinformation to the public on how it handles users’ data who sign-up on its platform. This Cambridge Analytica scandal hints that data of over 50 million Facebook account is said to be illegally accessed and Facebook has shed over $60 billion from its market value until now. The huge uproar from digital rights activists, regulators, and legislators for protection of users’ data is rising and even WhatsApp’s co-founder, Brian Acton has recently tweeted with a hashtag “#deletefacebook”.
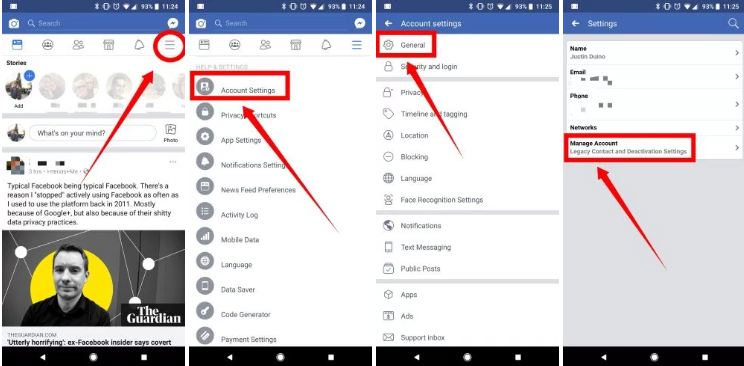
So in a case, if you have fallen out of love with Facebook, it’s easy to delete or deactivate your account. But before taking that bold decision here is an alternative through which you can disable Facebook’s data sharing to protect your information. If you still think that this would not be sufficient here’s our simple guide to permanently delete or temporarily deactivate your Facebook account.
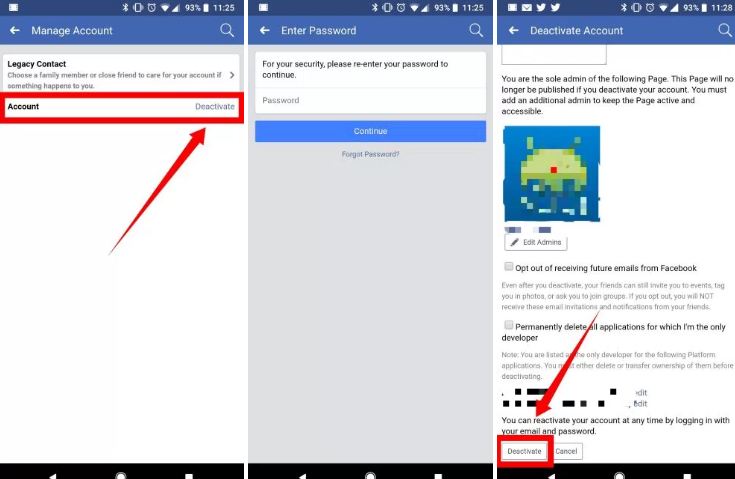
Deleting your Facebook account from your phone is even easier than deactivating it. But first, remember, deleting your account is a permanent process and cannot be reversed.
In a case, if you want to save your Facebook data on your computer, tap on the down arrow next to your profile picture, and select Settings.
Below the list of options, you can click on Download a copy of your Facebook data. Select Start My Archive and the file will be downloaded to your computer.
UAE-based venture builder Disrupt.com has announced a $100 million investment commitment aimed at supporting early-stage…
Meta has fixed a glitch that caused violent and graphic videos to appear in Instagram…
Islamabad: The Senate Standing Committee on IT and Telecom, under the leadership of Senator Palwasha…
ABHI, in collaboration with TPL Corp Limited, has officially rebranded FINCA Microfinance Bank as ABHI…
Islamabad: The Federal Ministry of Education has taken a significant step towards equipping government schools…
Karachi: The Sindh government has launched a scheme to provide free "pink scooters" to women…